Robotaxi 是邪路

自动驾驶有两条主要路线,一条是由 Waymo 主导的 Robotaxi 路线,只为用户提供点 A 到 点 B 的服务,一上来就是L4,另一条是由 Tesla 主导的造车路线,逐步改进提高。

不看好 Robotaxi 路线的主要原因有:

  1. Market 太小,相对于汽车销售来说。可能有人会说有了 Robotaxi 之后就不用买车了,然而即使是在买车成本 >> 打车成本的中国,汽车销售依然是巨大的市场。所以这一点不成立。
  2. 缺少渐进路线。Robotaxi 必须要达到一个很高的自动化程度才能还是有意义,然而即使是最简单的用超声波雷达做的自适应巡航,对于司机的驾驶感受都是很有意义的。
  3. 采集用于训练的数据量不如造车路线。

相比之下,从造车开始逐步提供辅助驾驶积累数据,到完成L4自动驾驶,再开启 Robotaxi 将会实现对前者的降维打击。

特斯拉和电动三傻(蔚来,理想和小鹏)

最近国产 Model Y 降价,正好趁着这个机会谢谢我对电动车行业的思考。

首先声明,本文完全从一个财务投资者的视角,不讨论产品本身,纯主观观点。

观点1: 汽车的未来在于智能化,智能化的核心在于无人驾驶

无人驾驶车辆对于传统汽车的竞争将会是碾压性的。现在汽车之所以还没有广泛的普及无人驾驶,根本原因在于技术难度过高。在无人驾驶之外,汽车的智能化也已经有所普及,例如 Apple CarPlay 和 Android Auto。但是这些应用层的创新还不够,汽车的智能化的核心就是无人驾驶,将人的注意力解放出来。

观点2: 传统汽车厂商转向困难,必然会被智能化浪潮淘汰

理论上来说,任何一家传统汽车公司都可以制造新智能汽车,然而由于公司治理的原因,大公司通常来说很难有壮士断腕之心来进行转型,而且通常也缺乏转型所需要的人才。虽然传统汽车公司都知道智能化和电动化是方向,但是公司治理体系下转型困难,只能以温水煮青蛙的方式慢慢被时代淘汰。

观点3: 要想成为中国特斯拉,必须要在中国市场战胜特斯拉

现在蔚来,理想和小鹏的股价已经很高,其中必然包含未来成为中国特斯拉的期望。要成为中国特斯拉,必然要和特斯拉进行正面竞争。所以,我完全不同意所谓“蔚来和特斯拉完全不是同类型的车”的观点,不管现在的车型是否有竞争,和特斯拉的竞争在所难免。另外根据观点1,无人驾驶才是智能汽车的核心竞争力,所谓“配置豪华”是一件想做就能做到的事情,竞争对手很容易就可以模仿改进,没有任何壁垒。

那么在蔚来,理想和小鹏之间,我更看好哪家呢?我目前的答案是小鹏,我现在唯一的不确定因素在于小鹏管理层的价值观,还需要时间来观察。

为什么我不看好理想?造车是一件非常困难的事情,在这件事情上必须要专注。理想两头下注必然导致资源和注意力的不集中,表面上看很好,但是要解决困难的事情,必须要集中注意力。

为什么我不看好蔚来?核心问题在于对智能化无人驾驶投入的不够,而且对于错位竞争的期许和对与特斯拉的直接竞争准备不足。

小鹏当然也有它的问题,主要的风险在于 1) 管理层的价值观。之前特斯拉偷代码事件闹的沸沸扬扬,我希望只是个例,而不是管理层价值观不正的缩影 2)过于激进的无人驾驶方案导致事故。

于此同时,我依然认为特斯拉本身也是非常有竞争力的,而且 Elon Musk 如果想要把中国市场做好,那就是一定可以做好的,主要的风险在于对中国市场投入不够,或者对中国区管理层信任不足,不能放权。在中国市场里竞争需要贴身肉搏,中国区管理层权限不足会很难对市场动向产生反馈,在局部里被国产品牌打压。在跨国公司里,这样的事情屡见不鲜。

特斯拉的核心竞争力在于领先对手的无人驾驶,以及规模化生产的成本控制。从某种意义上说,特斯拉之于国产三傻会是比苹果之于华为小米更难对付的存在,因为公开的无人驾驶算法还会不会存在很难预料,加上特斯拉根本不在乎维持“高端形象”,想象一个愿意和国产品牌拼刺刀的苹果,该会是多么的可怕!所以即使是每股价格高达$700的今天,特斯拉也是财务上很值得投资的一个。

从投资的角度看,我会继续下注小鹏和特斯拉,而不是理想和蔚来。这不代表蔚来和理想的股价会跌,因为智能汽车的市场会越来越大,但是小鹏和特斯拉会是更有可能的企业。

今天写下这篇文章,希望以后不会被打脸。

侃侃 Smallfoot

https://movie.douban.com/subject/26944582/

最近在飞机上看了这部动画片,看完真的有种不吐不快的感觉。也许对很多人来说,动画片只是给孩子看的而已,但是 Smallfoot 真的饱含了导演和编剧的很多想法,通过精巧的剧情设计传达给荧幕前的我们,这样正能量的精神内核,让我感慨不已。

故事的剧情很简单,一群住在喜马拉雅山脉的野人,因为一个偶然的关系看到了一个人类,野人和人类开始了互相的试探,并在最后开始试着了解和接纳彼此。

我看完之后最感动的地方在于三点:

  1. 鼓励孩子的求知欲和探索欲,不迷信权威而要努力去寻找真知
  2. 要坚守初心,不要投机取巧走捷径而忘了你到底为什么出发的
  3. 如果你是多数群体,要接纳和了解不一样的人;如果你属于少数群体,也要勇敢走出柜子,不要将自己隐藏起来

这样的精神内核,通过动画片传递出来,不得不感叹导演和编剧的功力深厚。这是一部有爱,有笑又有深度的动画片,强烈推荐。

开100个线程下百度云!

最近有点东西要下载,找来找去只有百度云有。试了百度云的客户端,只能跑到70kbps,这TM下到猴年马月!

研究了一下,最终还是找到了解决办法,成功通过开100个线程的方式,把下载速度干到了7Mbps。总结如下:

1. 装直链脚本,地址在这里:https://greasyfork.org/en/scripts/39776-%E7%99%BE%E5%BA%A6%E7%BD%91%E7%9B%98%E7%9B%B4%E6%8E%A5%E4%B8%8B%E8%BD%BD%E5%8A%A9%E6%89%8B%E4%BF%AE%E6%94%B9%E7%89%88

2. Mac 实在没有什么好的下载工具,找来找去还是 axel 最简单。Homebrew 装 axel,没有 Homebrew 的话先到这里装上: https://brew.sh/

然后

brew install axel

3. 最后一步,开 100 个线程下!

先用直链脚本弄到下载地址,然后

axel -a -n 100 "下载地址"

效果感人

感觉应该可以开到200个线程跑到上限的,不过差不多够了

SAE死了, 精神上彻底死了

大概是一个月之前 SAE 又改收费规则了, 结果就是所有使用数据库的应用都要交一个所谓的 MySQL 租金, 我账户里原先盘算的能用两三年的余额瞬间没了.

现在来看两年前把博客从 SAE 迁出真是一个非常明智的决定, 现在可以彻底告别 SAE 了.

Screen Shot 2016-04-10 at 11.57.25

Introducing No Wakelock

Hi, No Wakelock is a new Android app I developed. It gives user the ability to disable wakelocks of specified apps, which are usually the root cause of battery drain. It requires Xposed to function normally.

How it works?

Android allows apps to use partial WAKE_LOCK to keep devices awake while screen is off. However, this mechanism is often abused as some Android developers introduced it into network related operations. As a matter of fact, network events will wake devices up automatically and only pure CPU operations require wakelocks to prevent device from falling asleep.

Disabling partial WAKE_LOCK is usually safe and has little impact on the functionality of Android apps, except if you are doing CPU intensive work like video rendering, π calculation etc.

How to use it?

First of all, enable the Xposed module.

Screenshot_2015-10-01-09-40-52

It is recommended to use No Wakelock with other apps like Greenify. If you do not wish to have an app running in the background while screen is off, simply greenify it. If you have an app that you wish to have it running in the background, but at the same time want to minimize its battery usage, then do not greenify it. Instead, use No Wakelock to restrict its access to wakelocks.

It is recommended to identify the apps that use excess wakelocks first. Tools that can help you with that include Wakelock Detector.

Screenshot_2015-10-01-08-51-56

Then open No Wakelock, locate the app you want to disable.

Screenshot_2015-10-01-09-08-38

Then, choose the types of wakelocks you want to disable.

What to disable?

Partial Wakelock: This is the wakelock that prevents your CPU from falling into sleep while screen is off.

All Other Wakelocks: This is the wakelock that prevents your screen from turning off.

Sync Adapters: Sync Adapters can also keep devices awake. If you do not need synchronisation, you can disable it.

Align AlarmManager Wake-ups: (>= Android 4.4 only) Use this option to force align all wakeups caused by AlarmManager so that the CPU can keep asleep for as long as possible. Please be reminded that this option might postpone or break push notifications of apps that are improperly designed.

These four options should be enough for 99% of the users. However, if you wish to have more precise control over your phone’s wakelocks, you can enable this option:

Apply Custom Black/Whitelist: This is an advance option. Common users usually do not need to touch this unless you are clear what you are doing. If you wish to enable it, please edit the custom black/whitelist first. For more information about black/whitelist, read the next session.

  • Setup Example: Google Play Services

If you are using Google Play Services, it may be consuming too much battery. So you checked the battery usage of Google Play Services, and it turned out that Google Play Services is keeping your device awake even when you are not using it. To save your battery, open “No Wakelock”, navigate to Google Play Services (Enable system apps first in No Wakelock settings), disable partial wakelock and leave everything unchanged. Restart your device to make this effective.

Google Play Services will now no longer consume too much battery. The best part is that GCM notifications & Google Account Sync are all working as normal. Woohoo!

Screenshot_2015-10-01-09-08-48

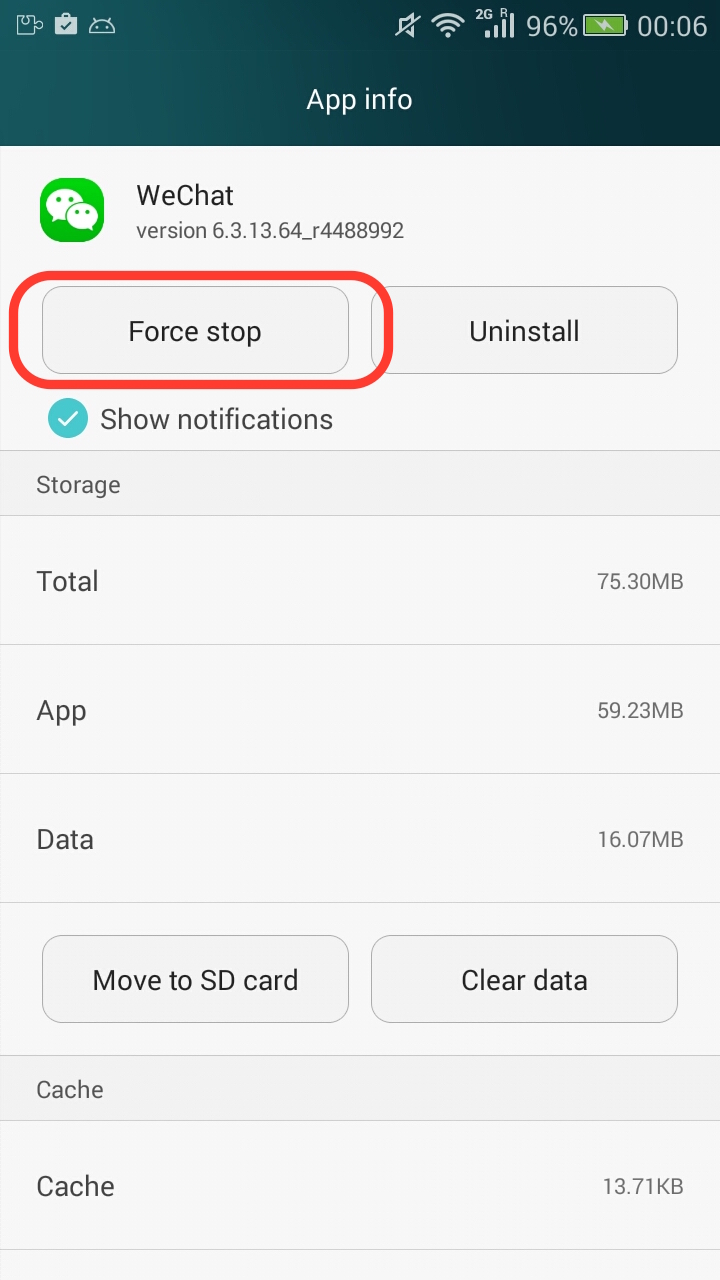
Force stop the app(if you only change the settings of one app) or reboot your devices(if you changed the settings of a lot of apps) to make all settings effective.

Screenshot_2016-02-14-00-06-48

That’s all. Your device can have a good night’s sleep now.

Advanced Option: Black/WhiteList

Please be reminded that this is only for advanced users.

If you decide to enable it, the priority of wakelock matching becomes: blacklist > whitelist > other settings for the app.

To edit your black/whitelist, click the “Edit” button on the top right and fill in the black/whitelist in corresponding columns.

Black/Whitelist works in the way that matches wakelocks’ names. You can write regular expressions on each line. For instance, if you saw a wakelock named WakeLock:12345 & a wakelock named WakeLock:abcde are keeping your device awake, you can fill in these content in your blacklist:

WakeLock:\d+
WakeLock:[a-zA-Z]+

Please be reminded that one and only one regular expression should appear on each line. Do not insert extra new lines as this will invalidate all settings for this app.

Get it now!

Download No Wakelock at Google Play: https://play.google.com/store/apps/details?id=com.linangran.nowakelock

Purchase Donation Pack at Google Play: https://play.google.com/store/apps/details?id=com.linangran.nowakelock.donation

关于禁止唤醒

禁止唤醒是我开发的一款应用, 它允许用户禁用掉特定应用的唤醒锁. 可以在不影响推送的情况下, 大大降低应用的耗电量. 唤醒锁在 Android 中的滥用十分普遍, 特别是在国内, 各路应用纷纷使用唤醒锁来上传下载资料, 既泄露隐私又耗费电量.

禁止唤醒需要 Xposed 模块以正常工作.

省电原理

Android 系统允许应用使用CPU唤醒锁来使设备在息屏时保持唤醒状态. 然而, 这个机制在国内 Android 应用中的滥用十分普遍. 很多 Android 开发者错误的在网络通信中加入唤醒锁, 然而实际上, 这种做法除了白白消耗电池之外没有任何作用.

禁用唤醒锁通常不会有什么副作用, 对应用本身的功能影响也十分有限. 正确设置”禁止唤醒”可以在不影响微信等消息推送的前提下节省大量后台电量消耗.

使用方法

首先, 启用 Xposed 模块.

Screenshot_2015-10-01-09-21-53

禁止唤醒主要用于应对那些你希望在后台运行的应用. 对于那些不需要在后台运行的应用, 推荐使用绿色守护直接干掉. 对于那些你希望在后台运行, 但是又特别耗电的应用, 使用禁止唤醒来限制它们使用CPU唤醒锁, 以让设备可以正常休眠.

开始之前, 建议先使用 Wakelock Detector 之类的应用查看过度使用唤醒锁的应用.

Screenshot_2015-10-01-08-51-56

然后打开禁止唤醒, 找到你希望禁止的应用.

Screenshot_2015-10-01-09-22-21

然后, 选择你希望禁用的唤醒类型.

如何设置?

CPU唤醒锁: 这是在息屏后阻止你的设备进入休眠状态的唤醒锁, 禁用它通常不会有任何问题.

所有其它唤醒锁: 除了CPU唤醒锁之外, 还有一些唤醒锁可以阻止设备休眠, 甚至阻止设备息屏. 开启这个选项以禁用这些唤醒锁.

同步: 同步也可以唤醒设备, 如果你不需要应用的同步功能, 使用这个选项来禁用掉它.

对齐定时器: (>= Android 4.4) AlarmManager可以使用定时器来周期性的唤醒设备, 阻止CPU进入长期休眠状态. 启用这个选项来强制对齐定时器, 让它们尽量在同一时间触发以节省电量. 请注意: 对于设计不良的应用, 启用此选项有可能会引发推送消息延迟.

99%的用户使用以上四项即可完美控制好应用的唤醒问题. 然而, 如果你希望对禁止唤醒的唤醒锁管理有更精细的控制, 您可以启用以下选项.

应用自定义黑/白名单: 这是一个高级选项, 如果您确定您要使用黑/白名单机制, 请先通过右上角的编辑按钮设置黑白名单. 了解更多黑/白名单信息, 请看下一节.

  • 设置示例: 微信

微信在后台运行时消耗大量电量, 在电池设置中查看微信的耗电量, 发现微信在设备息屏时保持设备唤醒而无法进入休眠状态. 要减少微信的电量消耗, 打开禁止唤醒, 找到微信, 禁用CPU唤醒锁和同步, 保持所有其它选项不更改, 重启设备以应用更改.

微信不会再消耗大量的电量. 更好的是, 微信的推送一如既往的及时准确, 没有任何功能被破坏.

Screenshot_2015-10-01-09-22-28

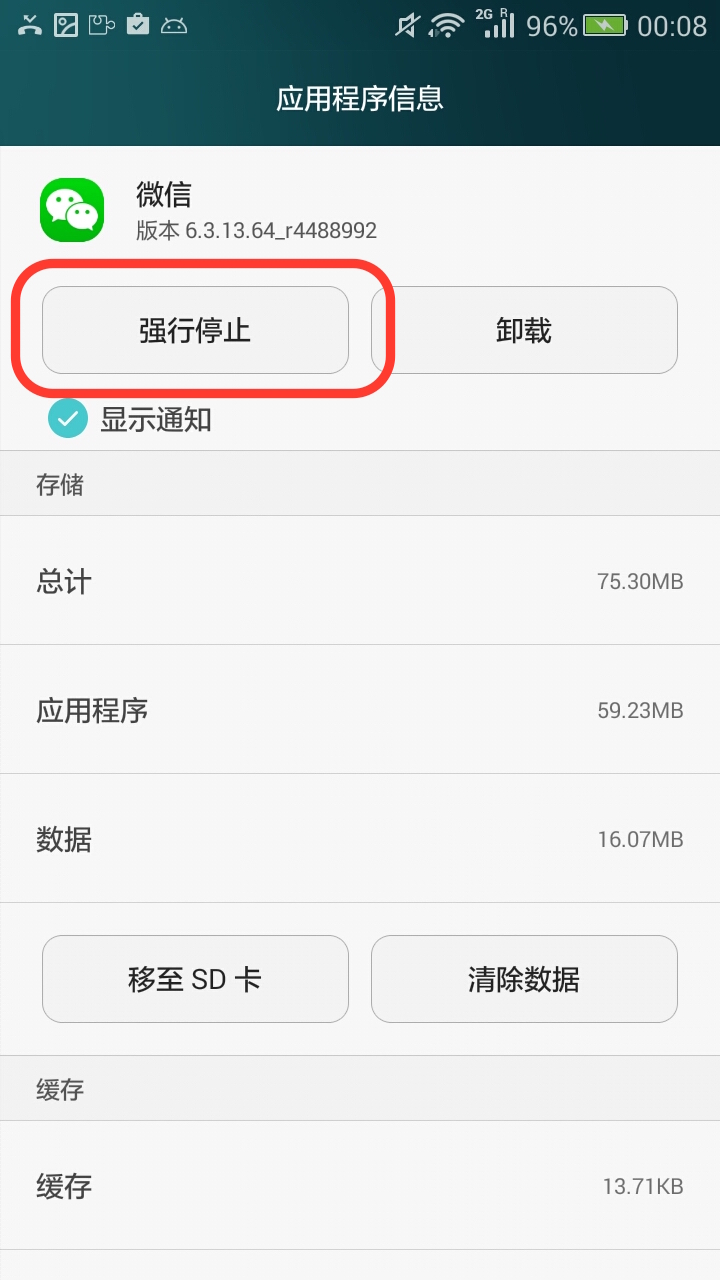
强行停止对应的应用(如果你只修改了一个应用的设置)或者重启设备(如果你更改了大量应用的设置)以让更改生效.

Screenshot_2016-02-14-00-08-14

就是这样了! 你的设备现在可以好好的”睡一觉”了.

高级设置: 黑/白名单

请注意: 此项设置仅供高级用户使用.

当您针对某个应用启用黑/白名单功能后, 唤醒锁匹配的优先级为 黑名单 > 白名单 > 您的其他设置.

要编辑黑/白名单, 请点击右上角的编辑按钮, 然后在黑名单唤醒锁和白名单唤醒锁两栏下, 分别填入您的黑/白名单信息.

黑/白名单针对唤醒锁的名称进行过滤, 每行一个, 支持正则表达式. 例如, 您看到某个应用正在使用名为 WakeLock:12345 的唤醒锁和名为 WakeLock:abcde 的唤醒锁唤醒设备, 您可以这样填入正则表达式:

WakeLock:\d+
WakeLock:[a-zA-Z]+

请注意, 正则表达式每行有且仅有一个. 请不要插入多余的空行, 这会导致针对此应用的设置完全失效.

立即下载

在 Google Play 下载禁止唤醒: https://play.google.com/store/apps/details?id=com.linangran.nowakelock

在 Google Play 购买捐赠包: https://play.google.com/store/apps/details?id=com.linangran.nowakelock.donation

“Multiple dex files define” Error in Android development Caused by IntelliJ IDEA bug.

Recently I encountered a “Multiple Dex Files Define” error when writing and building Android libraries. After a lot of work, the root reason is attributed to a IntelliJ IDEA bug which appears when you are using .classpath(Eclipse style) project configuration file format. I reported this bug to Jetbrains and they had confirmed my report on it. It is now being tracked in their bug system. Before Jetbrains fix the bug, you can avoid it by using .iml(IntelliJ style) project configuration file format.

Here is how I encountered and reproduced this bug, which is also available through https://youtrack.jetbrains.com/issue/IDEA-144038.

When exporting jars, the same configuration will have different output behaviors using different config file style (.classpath/.iml)

How to reproduce:

Suppose here is my project structure:
RootAndroidApplication
AndroidLibraryModuleA
AndroidLibraryModuleB

AndroidLibraryModuleA depends on AndroidLibraryModuleB, RootAndroidApplication depends on both AndroidLibraryModuleA and AndroidLibraryModuleB.
Now we want to export AndroidLibraryModuleA and AndroidLibraryModuleB as jar without resources. In other words, we are only using the Java code part.

In artifacts settings, we add to jar configurations. For AndroidLibraryModuleA we only include AndroidLibraryModuleA compile output. For AndroidLibraryModuleB we only include AndroidLibraryModuleB compile output.

In AndroidLibraryModuleA we change the compile level of dependency AndroidLibraryModuleB to “provided”. Then we build the artifacts of AndroidLibraryModuleA.

If we open the jar file exported, we can see only compiled classes from AndroidLibraryModuleA is listed here.

However, if we keep everything unchanged, just switch the project file format from IntelliJ’s .iml to Eclipse’s .classpath of AndroidLibraryModuleA. Then we rebuild the artifacts.

Then the compiled classes from AndroidLibraryModuleB is listed in AndroidLibraryModuleA’s jar file.

I believe the .iml’s behavior is the intended one while the .classpath one’s behavior may result from a bug.

This difference will lead to a “Multiple dex files define” error when AndroidLibraryModuleA.jar and AndroidLibraryModuleB.jar are added to another project as jar dependency as there are duplicate class files in two jars.

Use HAProxy to load balance 300k concurrent tcp socket connections: Port Exhaustion, Keep-alive and others

I’m trying to build up a push system recently. To increase the scalability of the system, the best practice is to make each connection as stateless as possible. Therefore when bottleneck appears, the capacity of the whole system can be easily expanded by adding more machines. Speaking of load balancing and reverse proxying, Nginx is probably the most famous and acknowledged one. However, TCP proxying is a rather recent thing. Nginx introduced TCP load balancing and reverse proxying from v1.9, which is released in late May this year with a lot of missing features. On the other hand, HAProxy, as the pioneer of TCP loading balacing, is rather mature and stable. I chose to use HAProxy to build up the system and eventually I reached a result of 300k concurrent tcp socket connections. I could have achieved a higher number if it were not for my rather outdated client PC.

Step 1. Tuning the Linux system

300k concurrent connection is not a easy job for even the high end server PC. To begin with, we need to tune the linux kernel configuration to make the most use of our server.

File Descriptors

Since sockets are considered equivalent to files from the system perspective, the default file descriptors limit is rather small for our 300k target. Modify /etc/sysctl.conf to add the following lines:

fs.file-max = 10000000 
fs.nr_open = 10000000

These lines increase the total file descriptors’ number to 1 million.
Next, modify /etc/security/limits.conf to add the following lines:

* soft nofile 10000000
* hard nofile 10000000
root soft nofile 10000000
root hard nofile 10000000

If you are a non-root user, the first two lines should do the job. However, if you are running HAProxy as root user, you need to claim that for root user explicitly.

TCP Buffer

Holding such a huge number of connections costs a lot of memory. To reduce memory use, modify /etc/sysctl.conf to add the following lines.

net.ipv4.tcp_mem = 786432 1697152 1945728
net.ipv4.tcp_rmem = 4096 4096 16777216
net.ipv4.tcp_wmem = 4096 4096 16777216

Step 2. Tuning HAProxy

Upon finishing tuning Linux kernel, we need to tune HAProxy to better fit our requirements.

Increase Max Connections

In HAProxy, there is a “max connection cap” both globally and backend specifically. In order to increase the cap, we need to add a line of configuration under the global scope.

maxconn 2000000

Then we add the same line to our backend scope, which makes our backend look like this:

backend pushserver
        mode tcp
        balance roundrobin
        maxconn 2000000

Tuning Timeout

By default, HAProxy will detect dead connections and close inactive ones. However,  the default keepalive threshold is too low and when applied to a circumstance where connections have to be kept in a long-pulling way. From my client side, my long socket connection to the push server is always closed by HAProxy as the heartbeat is 4 minutes in my client implementation. Heartbeat that is too frequent is a heavy burden for both client (actually android device) and server. To increase this limit, add the following lines to your backend. By default these numbers are all in milliseconds.

 timeout connect 5000
 timeout client 50000
 timeout server 50000

Configuring Source IP to solve port exhaustion

When you are facing simultaneous 30k connections, you will encounter the problem of “port exhaustion”. It is resulted from the fact that each reverse proxied connection will  occupy an available port of a local IP. The default IP range that is available for outgoing connections is around 30k~60k. In other words, we only have 30k ports available for one IP. This is not enough. We can increase this range by modify /etc/sysctl.conf to add the following line.

net.ipv4.ip_local_port_range = 1000 65535

But this does not solve the root problem, we will still run out of ports when the 60k cap is reached.

The ultimate solution to this port exhaustion issue is to increase the number of available IPs. First of all, we bind a new IP to a new virtual network interface.

ifconfig eth0:1 192.168.8.1

This command bind a intranet address to a virtual network interface eth0:1 whose hardware interface is eth0. This command can be executed several times to add arbitrary number of virtual network interfaces. Just remember that the IP should be in the same sub-network of your real application server. In other words, you cannot have any kind of NAT service in your link between HAProxy and application server. Otherwise, this will not work.

Next, we need to config HAProxy to use these fresh IPs. There is a source command that can be used either in a backend scope or as a argument of server command. In our experiment, the backend scope one doesn’t seem to work, so we chose the argument one. This is how HAProxy config file looks like.

backend mqtt
        mode tcp
        balance roundrobin
        maxconn 2000000
        server app1 127.0.0.1:1883 source 192.168.8.1
        server app2 127.0.0.1:1883 source 192.168.8.2
        server app3 127.0.0.1:1883 source 192.168.8.3
        server app4 127.0.0.1:1884 source 192.168.8.4
        server app5 127.0.0.1:1884 source 192.168.8.5
        server app6 127.0.0.1:1884 source 192.168.8.6

Here is the trick, you need to declare them in multiple entries and give them different app names. If you set the same app name for all four entries, the HAProxy will just not work. If you can have a look at the output of HAProxy status report, you will see that even though these entries has the same backend address, HAProxy still treats them as different apps.

That’s all for the configuration! Now your HAProxy should be able to handle over 300k concurrent TCP connections, just as mine.

IntelliJ / WebStorm slow debugging in Node.js

I recently experienced a severe slow debugging experience in IntelliJ + nodejs plugin / WebStorm, which made me to wait nearly one minute for my app to start. I tried to figured out why, and I noticed that the most of the time was spent on loading various packages.

Later on I found the cause for such slowness: the IDE’s break on exception option is enabled. In other words, the IDE will try catch almost every line of JavaScript code, no matter it is written by you or it is from a third party package, which leads to a huge performance loss.

Disabling it by navigating through menu ‘RUN -> View Breakpoints…’ and toggle ‘JavaScript Exception Breakpoints’. You will have your program debugging much faster. To further accelerate your experience, navigate through menu ‘Help -> Find Action…’, type in ‘Registry’ and enter. Uncheck ‘js.debugger.v8.use.any.breakpoint’.

Now your nodejs program should run in debug mode as fast as it is not.